はじめに
前回に引き続き MANTA M5P の導入を進める.

今回はジャンパ接続箇所の整理とCB1/CM4の初期設定を行う.
材料
ここでいくつか材料を追加.
- micro HDMI アダプタ
- NW の初期設定のときだけ使う.
- Wi-Fi USB ドングル
- オンボード Wi-Fi の技適もアンテナの配線も気にしなくていいので GOOD.
- CB1 専用ヒートシンク
- 意外とホカホカになりそうな気がするので必須.
JUMPER
VUSB – USB Power Supply
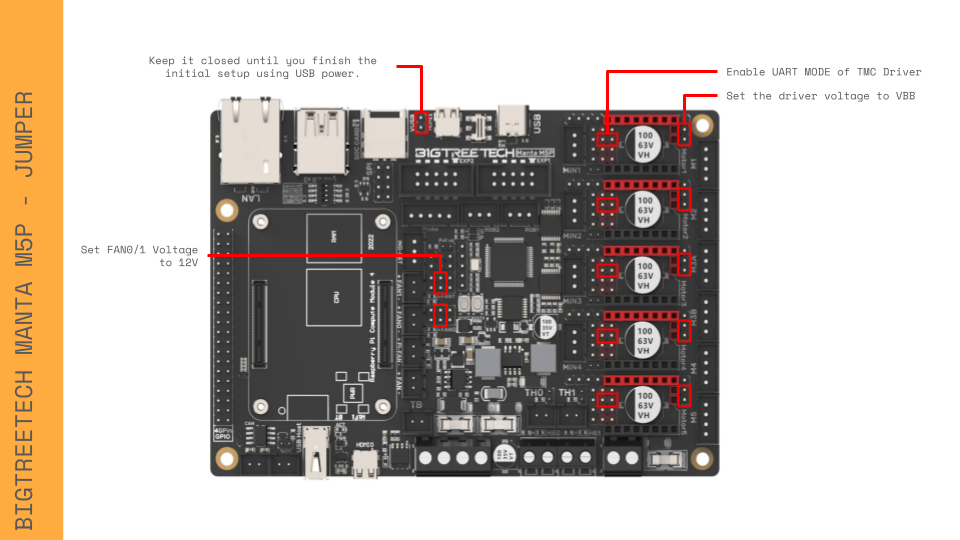
これは前回と同じ.Linux 周りの初期設定のため,VUSB を接続して USB 給電出来るようにする.初期設定が終わったらオープンにする.
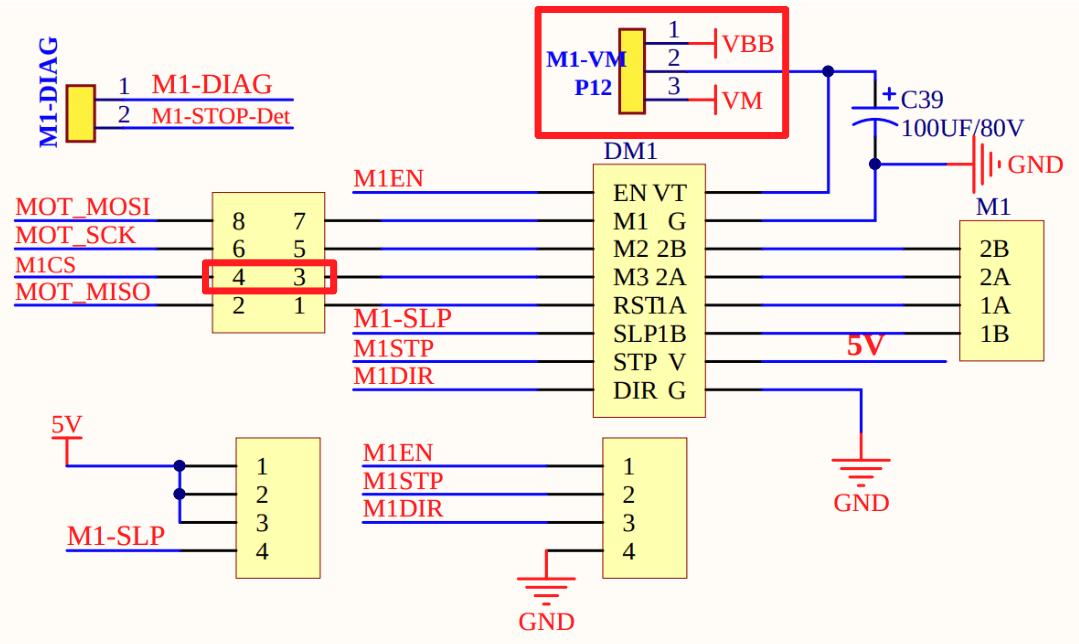
CS – UART Mode of TMC Driver
マイクロステップや電流をファームウェアから制御出来るように CS ピンを接続する.
Driver Voltage Selection
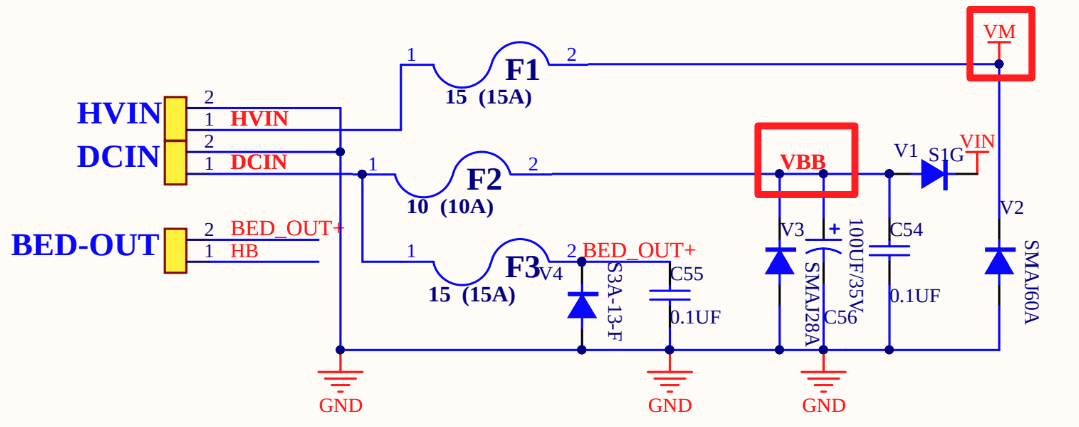
MANTA は電源のコンバータやモータドライバの仕様にあわせてモータドライバに供給する電源電圧を VH と VBB の2種類から選択することが出来る.初めて BIGTREETECH のマザーボードを触る人にはわかりにくそうなので整理しておく.
| 電源名称 | 電源電圧 | 説明 |
|---|---|---|
| Motherboard Input Voltage | VIN=DC12V or DC24V | VIN は DCIN から供給される電源. |
| Driver Input Voltage | VIN (DC12V-24V), HV (DC24V-56V) Selectable | HV は HVIN から供給される電源. ジャンパでモータドライバの駆動電圧を VIN(DCIN) もしくは HV(HVIN) に設定出来る. |
AI3M に搭載されている電源 S-300-12 の出力電圧は 12V なので,今回は VBB を利用してドライバを駆動する.VBB での運用が不安定だったら,HVIN にも 12V を入力して安定するか観察することにする.
| 型番 | S-300-12 |
| 入力電圧/周波数 | 100 – 120VAC/60Hz 200 – 220VAC/50Hz |
| 出力電圧 | 12VDC 25A |
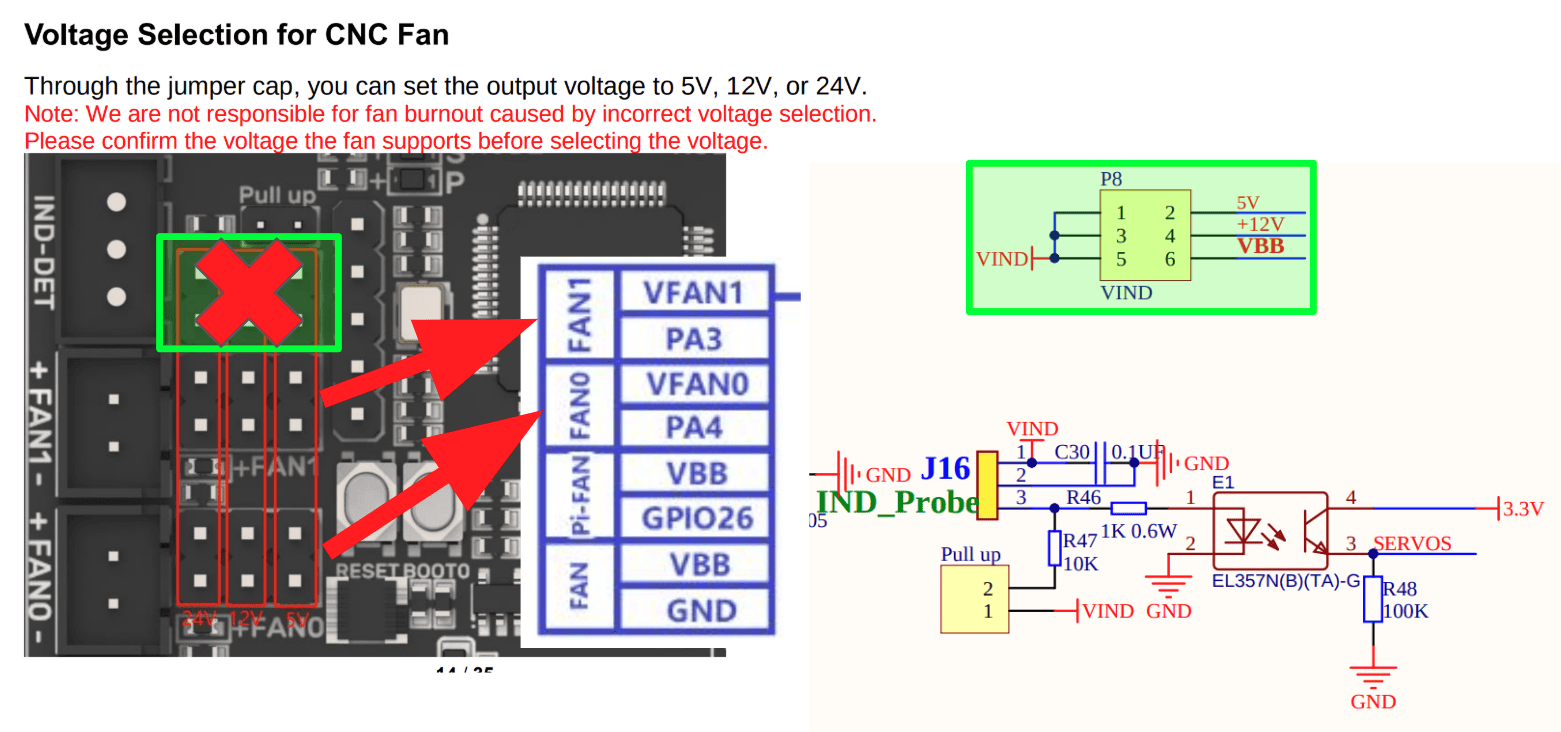
Voltage Selection for CNC Fan
MANTA では FAN0 と FAN1 の電源電圧をジャンパで選択出来る.今回は 12V 駆動にしたいので P9,10 の 3-4 番ピンをジャンパで接続する.
ユーザマニュアルでは IND-DET (Inductive Sensor) の電源電圧選択ピン P8 まで赤枠で囲ってある間違いがある点に注意.
SETUP CB1
CB1 vs CM4
BIGTREETECH CB1 は RasPi の供給不足に対応するために作った SBC で,eMMC の有無で2タイプの製品がラインナップされている.技適は通ってなさそうだけど,CM4 の値段を考えると技適取得されている Wi-Fi ドングルを買ってもお釣りが来る.しかもドングルを使っておけばアンテナの取り回しに困ることはない.
CM4 は,無線機能の有無,RAN 容量,eMMC 容量の違いで 32タイプがラインナップされている.技適(020-210202)通ってるので日本国内でも安心して使えるが,一番スペックの低い CM4001000 でも税込み 5,610 円.
| 項目 | BIGTREETECH CB1/CB1 eMMC | Raspberry Pi Compute Module 4 (CM4) |
|---|---|---|
| CPU | Allwinner H616(クアッドコア ARM Cortex-A53、最大 1.5GHz) | Broadcom BCM2711(クアッドコア ARM Cortex-A72、1.5GHz) |
| GPU | Mali G31 MP2、OpenGL3.2 | Broadcom VideoCore VI |
| RAM | 512MB/1GB DDR3L | 1GB、2GB、4GB、8GB LPDDR4-3200 |
| ストレージ | 外部 microSD カードスロット/16GB, 32GB | オプションの eMMC(8GB、16GB、32GB)または外部 microSD カードスロット |
| Wi-Fi | 2.4GHz 802.11 b/g/n | 2.4GHz および 5GHz 802.11 b/g/n/ac(オプション) |
| Bluetooth | 非対応 | Bluetooth 5.0(オプション) |
| インターフェース | 2 × 100 ピン BTB コネクタ、40 ピン GPIO ヘッダ、HDMI 2.0a(4K 対応)、USB 2.0、イーサネット | 2 × 100 ピン コネクタ、28 ピン GPIO、2 × HDMI 2.0(4K 対応)、USB 2.0、PCIe、イーサネット |
| 寸法 | 40mm × 55mm | 55mm × 40mm |
| 電源要件 | 5V ±5%、2A | 5V(電流要件は使用状況による) |
| 価格 | 3,500 〜 5,000円 | 5,610円(CM4001000) 〜 18,293円(CM4108032) |
CB1 では Armbian をベースにして Klipper を同梱した専用 OS が用意されている.最新バージョンは V3.0.0 だが,印刷中にフリーズするバグが報告されている.

OS 書き込み
今回はいろいろあって比較的お手軽そうな CB1 専用 OS V3.0.0 を利用する.そろそろフリーズバグに遭遇しないことをお祈りしながら,イメージを uSD に書き込む.フリーズバグが心配な人は V2.3.4 を選択したほうがいいかもしれない.
$ sudo fdisk -l /dev/sdd
Disk /dev/sdd: 29.12 GiB, 31267487744 bytes, 61069312 sectors
Disk model: USB3.0 CRW   -SD
Units: sectors of 1 * 512 = 512 bytes
Sector size (logical/physical): 512 bytes / 512 bytes
I/O size (minimum/optimal): 512 bytes / 512 bytes
Disklabel type: dos
Disk identifier: 0x00000000

$ sudo dd if=CB1_Debian12_Klipper_kernel6.6_20241219.img of=/dev/sdd status=progress
5814699008 bytes (5.8 GB, 5.4 GiB) copied, 511 s, 11.4 MB/s
11386880+0 records in
11386880+0 records out
5830082560 bytes (5.8 GB, 5.4 GiB) copied, 516.139 s, 11.3 MB/s
書き込みが終わったら適当な場所にマウントして設定ファイルをお好みに合わせて修正する.ここで重要なファイルは system.cfg と armbianEnv.txt ( V2 系では BoardEnv.txt ) の2つ.
一旦全部デフォルトのままにしておいて,後で必要な設定を修正していくことにする.必要な設定があればお好みでどうぞ.
#-----------------------------------------#
check_interval=5        # Cycle to detect whether wifi is connected, time 5s

eth=end0        # Ethernet card device number
wlan=wlan0      # Wireless NIC device number

#hostname="BIGTREETECH-CB1"

###########################################
# System time zone setting, default Time zone: Etc/UTC (UTC, +0000)
# More settable time zones can be viewed by running the command: timedatectl list-timezones
#TimeZone="Asia/Shanghai"

###########################################
## klipperScreen Target Screen
## ks_src: "HDMI-1", "TFT35"
#ks_src="HDMI-1"

## ks_angle: Rotation angle
##       normal: 0; inverted: 180;
##       left: 90; right: 270;
#ks_angle="normal"

###########################################
## wifi name
#WIFI_SSID="ZYIPTest"
## wifi password
#WIFI_PASSWD="12345678"

###########################################
# BTT-PAD7 (ON/OFF)
BTT_PAD7="OFF"
# touch vibration effects
TOUCH_VIBRATION="OFF"
# touch sound effects
TOUCH_SOUND="OFF"
# Automatic brightness adjustment
AUTO_BRIGHTNESS="OFF"
###########################################
verbosity=1
bootlogo=false
disp_mode=1024x600p60
overlay_prefix=sun50i-h616
#------------------------------------------------#
## 'cb1-sd.dtb' for CB1, 'cb1-emmc.dtb' for CB1 eMMC version
fdtfile=sun50i-h616-bigtreetech-cb1-sd.dtb
## default 'display' for debug, 'serial' for /dev/ttyS0
console=display
## Specify HDMI output resolution (eg. extraargs=video=HDMI-A-1:800x480-24@60)
#extraargs=video=HDMI-A-1:1024x600-24@60
## uncomment for ws2812
#overlays=ws2812
## uncomment for i2c-gpio, pwm3, disable uart0 for pwm3
#overlays=light
## uncomment for pad7 vibration motor gpio
#overlays=pad7_vibration
## uncomment for TFT35_SPI screen
#overlays=tft35_spi
## tft35 rotate: 0, 90, 180, 270
#param_tft35_spi_rotate=0
## uncomment MCP2515 spi to canbus module
#overlays=mcp2515
## uncomment to release 'i2c0'(PI5/PI6) to user space
#overlays=i2c0
## uncomment to release 'spidev0.0' to user space
#overlays=spidev0_0
## uncomment to release 'spidev1.0' to user space
#overlays=spidev1_0
## uncomment to release 'spidev1.1' to user space
#overlays=spidev1_1
## uncomment to release 'spidev1.2' to user space
#overlays=spidev1_2
## uncomment to set 'PH10' for IR
#overlays=ir
## uncomment 'param_gpio_shutdown_pin' & 'param_gpio_shutdown_level' to enable gpio_shutdown feature
## set the gpio of detect pin
#param_gpio_shutdown_pin=PC8
## shutdown level: 0=Falling, 1=Rising
#param_gpio_shutdown_level=0
## write the config after the 'overlays' and separate it with a space when multiple functions are enabled
#overlays=disable_uart0 pwm ws2812 light tft35_spi mcp2515 i2c0 spidev0_0 spidev1_0 spidev1_1 spidev1_2 ir
#------------------------------------------------#
rootdev=UUID=00000000-0000-0000-0000-000000000000
rootfstype=ext4
usbstoragequirks=0x2537:0x1066:u,0x2537:0x1068:u
ネットワーク設定
以下を接続して USB Type-C 給電で起動.
- uSDカード
- キーボード
- HDMI
- Wi-Fi USBドングル
- モータドライバ TMC2208
- TFT35
起動するとHDMI のディスプレイに Klipper の画面が表示されるので,Ctrl + Alt + F3 でコンソールに切り替える.
ID: biqu
PW: biqu
nmtui を起動して,Activate a connection から Wi-Fi USBドングルのネットワークを有効化する.ついでに IP アドレスを固定化しておくといい.
$ sudo nmtui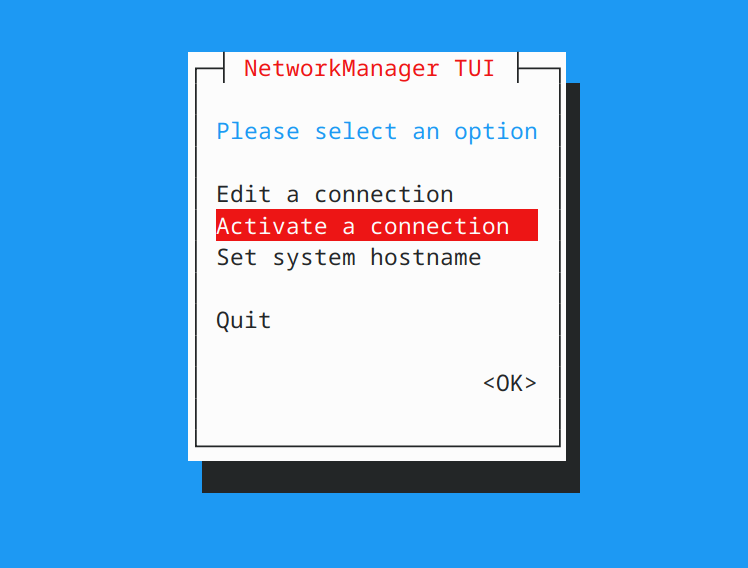
ip a とか ifconfig でIPアドレスが割り当てられていることが確認できたら,exit してネットワーク設定終了.この設定のついでに static IP を割り当てておいたほうが後の初期設定時に探す手間が省けて良い.
CB1 & MANTA M5P 初期設定
ssh接続する.
$ ssh biqu@xxx.xxx.xxx.xxx
biqu@xxx.xxx.xxx.xxx's password:
  ___ ___ ___ _____ ___ ___ ___ _____ ___ ___ _  _      ___ ___ _
 | _ )_ _/ __|_   _| _ \ __| __|_   _| __/ __| || |___ / __| _ ) |
 | _ \| | (_ | | | |   / _|| _|  | | | _| (__| __ |___| (__| _ \ |
 |___/___\___| |_| |_|_\___|___| |_| |___\___|_||_|    \___|___/_|

 v3.0.0-25.02.0-trunk rolling for BigTreeTech CB1 running Armbian Linux 6.6.66-vendor-sunxi64

 Packages:     Debian stable (bookworm)
 Support:      DIY (custom image)
 IP addresses: (LAN) IPv4: xxx.xxx.xxx.xxx IPv6: xxxx:xxxx:xxxx:xxxx:xxxx:xxxx:xxxx:xxxx (WAN) xxx.xxx.xxx.xxx

 Performance:

 Load:         2%               Up time:       51 min
 Memory usage: 35% of 918M
 CPU temp:     47°C             Usage of /:    18% of 29G

 Commands:

 Configuration : armbian-config
 Monitoring    : htop

Last login: Sun Mar  9 05:45:07 2025 from xxx.xxx.xxx.xxx
Armbian にも raspi-config に似たコマンドがあるので,タイムゾーンだけ Asia/Tokyo に変えておく.他はお好みでどうぞ.
$ sudo rambian-configパッケージを諸々アップデートする.Armbian も Debian 系なのでパッケージ管理ツールは apt.フリーズバグがカーネル起因だったらアップデートされてないかなと思ったけど最新状態だった.
$ uname -a
Linux bigtreetech-cb1 6.6.66-vendor-sunxi64 #4 SMP Tue Dec 17 17:53:46 CST 2024 aarch64 GNU/Linux
$ sudo apt update
...<省略>
$ sudo apt upgrade
...<省略>
$ uname -a
Linux bigtreetech-cb1 6.6.66-vendor-sunxi64 #4 SMP Tue Dec 17 17:53:46 CST 2024 aarch64 GNU/Linux
Compile & Update MCU Firmware
make コマンドを実行すると設定画面が表示されるので,M5P に合わせて以下の通りコンパイル内容を設定する.わかりにくいかもしれないが,下の TUI のキャプションは M5P 用の設定内容を反映した状態.この状態で Quit する.
$ cd ~/klipper/
$ make menuconfig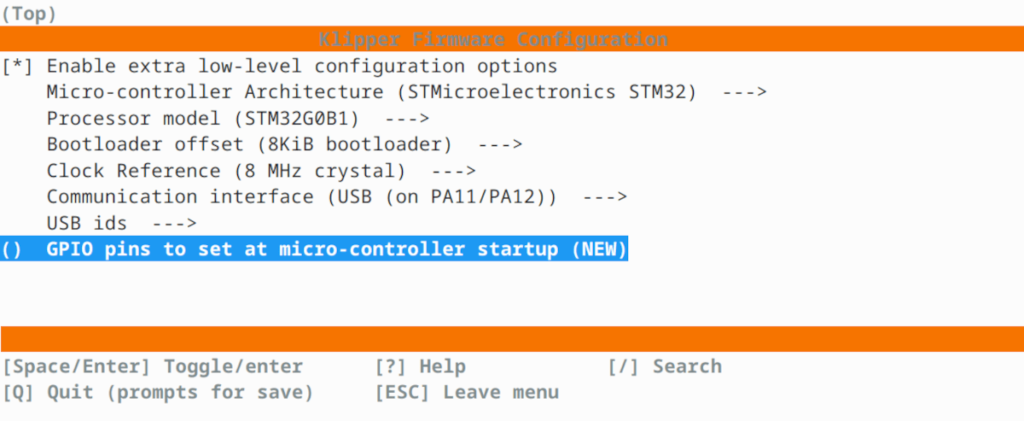
コンパイルする.
$ make
  Creating symbolic link out/board
  Building out/autoconf.h
  Compiling out/src/sched.o
  Compiling out/src/command.o
  Compiling out/src/basecmd.o
  Compiling out/src/debugcmds.o
  Compiling out/src/initial_pins.o
  Compiling out/src/gpiocmds.o
  Compiling out/src/stepper.o
  Compiling out/src/endstop.o
  Compiling out/src/trsync.o
  Compiling out/src/adccmds.o
  Compiling out/src/spicmds.o
  Compiling out/src/i2ccmds.o
  Compiling out/src/pwmcmds.o
  Compiling out/src/buttons.o
  Compiling out/src/tmcuart.o
  Compiling out/src/neopixel.o
  Compiling out/src/pulse_counter.o
  Compiling out/src/lcd_st7920.o
  Compiling out/src/lcd_hd44780.o
  Compiling out/src/spi_software.o
  Compiling out/src/i2c_software.o
  Compiling out/src/thermocouple.o
  Compiling out/src/sensor_adxl345.o
  Compiling out/src/sensor_lis2dw.o
  Compiling out/src/sensor_mpu9250.o
  Compiling out/src/sensor_hx71x.o
  Compiling out/src/sensor_ads1220.o
  Compiling out/src/sensor_ldc1612.o
  Compiling out/src/sensor_angle.o
  Compiling out/src/sensor_bulk.o
  Compiling out/src/stm32/watchdog.o
  Compiling out/src/stm32/gpio.o
  Compiling out/src/stm32/clockline.o
  Compiling out/src/stm32/dfu_reboot.o
  Compiling out/src/generic/crc16_ccitt.o
  Compiling out/src/generic/armcm_boot.o
  Compiling out/src/generic/armcm_irq.o
  Compiling out/src/generic/armcm_reset.o
  Compiling out/src/generic/timer_irq.o
  Compiling out/src/stm32/stm32f0_timer.o
  Compiling out/src/stm32/stm32g0.o
  Compiling out/src/stm32/gpioperiph.o
  Compiling out/src/stm32/stm32f0_adc.o
  Compiling out/src/stm32/stm32f0_i2c.o
  Compiling out/src/stm32/spi.o
  Compiling out/src/stm32/usbfs.o
  Compiling out/src/stm32/chipid.o
  Compiling out/src/generic/usb_cdc.o
  Compiling out/src/stm32/hard_pwm.o
  Building out/compile_time_request.o
Version: v0.12.0-401-g383b83d78
  Preprocessing out/src/generic/armcm_link.ld
  Linking out/klipper.elf
  Creating hex file out/klipper.bin
問題なくコンパイル完了.klipper.bin がファームウェア本体.
アップデート方法は,SD カードを使う方法と, DFU (Device Firmware Update) の2通り.今後の運用を考えると DFU の方が便利そうなので,今回は DFU でアップデートしてみる.
M5P がシリアルデバイスとして認識されていることを確認.
$ ls -l /dev/serial/by-id/
total 0
lrwxrwxrwx 1 root root 13 Dec 19 18:45 usb-Klipper_stm32g0b1xx_hurakan-if00 -> ../../ttyACM0
ファームウェアを書き込む.ちょこちょこエラー出てるけど, File downloaded successfully が表示されていれば成功らしい.
$ make flash FLASH_DEVICE=/dev/serial/by-id/usb-Klipper_stm32g0b1xx_hurakan-if00
  Building hid-flash
gcc -c -Wall -std=gnu99 -I . `pkg-config libusb-1.0 --cflags` main.c -o main.o
gcc -c -Wall -std=gnu99 -I . `pkg-config libusb-1.0 --cflags` hid-libusb.c -o hid-libusb.o
gcc -c -Wall -std=gnu99 -I . `pkg-config libusb-1.0 --cflags` rs232.c -o rs232.o
gcc -no-pie main.o hid-libusb.o rs232.o `pkg-config libusb-1.0 --libs` -lrt -lpthread -o hid-flash
  Flashing out/klipper.bin to /dev/serial/by-id/usb-Klipper_stm32g0b1xx_hurakan-if00
Entering bootloader on /dev/serial/by-id/usb-Klipper_stm32g0b1xx_hurakan-if00
Device reconnect on /sys/devices/platform/soc/5200000.usb/usb2/2-1/2-1.1/2-1.1:1.0
sudo dfu-util -p 2-1.1 -R -a 0 -s 0x8002000:leave -D out/klipper.bin

[sudo] password for biqu:
dfu-util 0.11

Copyright 2005-2009 Weston Schmidt, Harald Welte and OpenMoko Inc.
Copyright 2010-2021 Tormod Volden and Stefan Schmidt
This program is Free Software and has ABSOLUTELY NO WARRANTY
Please report bugs to http://sourceforge.net/p/dfu-util/tickets/

dfu-util: Warning: Invalid DFU suffix signature
dfu-util: A valid DFU suffix will be required in a future dfu-util release
Opening DFU capable USB device...
Device ID 0483:df11
Device DFU version 011a
Claiming USB DFU Interface...
Setting Alternate Interface #0 ...
Determining device status...
DFU state(2) = dfuIDLE, status(0) = No error condition is present
DFU mode device DFU version 011a
Device returned transfer size 1024
DfuSe interface name: "Internal Flash   "
Downloading element to address = 0x08002000, size = 37772
Erase           [=========================] 100%        37772 bytes
Erase    done.
Download        [=========================] 100%        37772 bytes
Download done.
File downloaded successfully
Submitting leave request...
dfu-util: Error during download get_status

Failed to flash to /dev/serial/by-id/usb-Klipper_stm32g0b1xx_hurakan-if00: Error running dfu-util

If the device is already in bootloader mode it can be flashed with the
following command:
  make flash FLASH_DEVICE=0483:df11
  OR
  make flash FLASH_DEVICE=1209:beba

If attempting to flash via 3.3V serial, then use:
  make serialflash FLASH_DEVICE=/dev/serial/by-id/usb-Klipper_stm32g0b1xx_hurakan-if00

make: *** [src/stm32/Makefile:111: flash] Error 255
おわりに
キリが良さそうなので,今回はファームウェアのアップデートまで.
次回は細かいファームウェアの設定と配線周りの整理を行う.
コメント