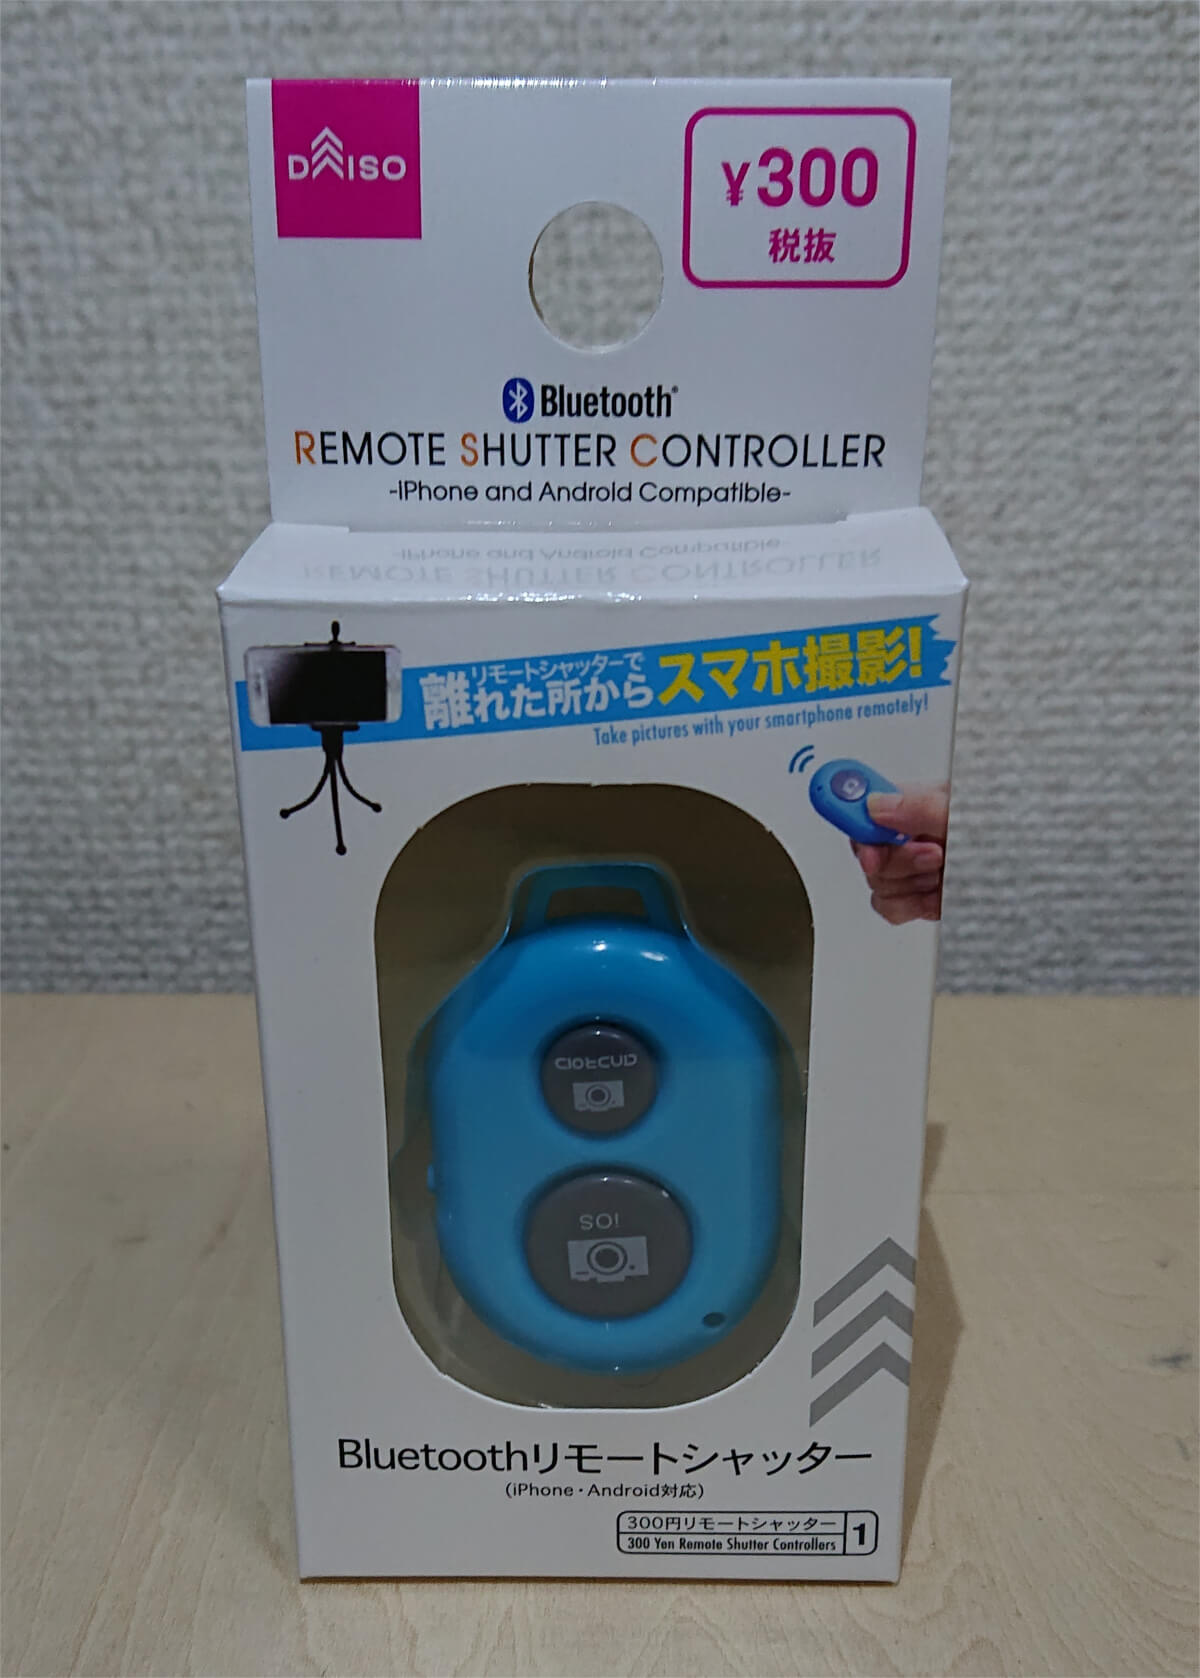
こんなものを買いました.Bluetoothシャッターを使ったIoTボタンのようなものはAmazonDashが流行った頃に人気だったみたい.
ノートPCをディスプレイに接続して使う場合に,ノートPCは閉じてどこかに立てておきたい.閉じてしまうと電源ボタンが押せなくなるので,このBluetoothシャッターを使ってRaspberryPiからWOL(WakeOnLan)で起動出来るようにします.
用意するもの
RasPiにボタンを実装するのもアリですが,わざわざRasPiのところにボタンを押しに行くのも面倒なのでBluetoothシャッターを使います.
- 起動させたいノートPC(WOL対応機器)
- RaspberryPi + Bluetooth
- RaspberryPi 3 以降は標準でBluetoothが実装されています
- Bluetoothが実装されていない場合はBluetoothドングルの用意が必要です
- ダイソーのBluetoothシャッター
- WOLに対応しているルーター
- ルーターの設定が必要な場合があります
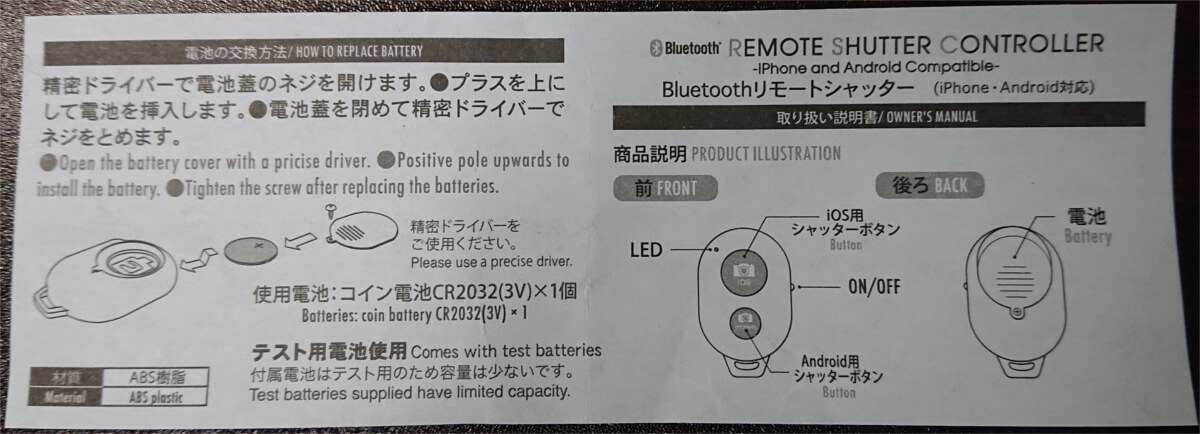
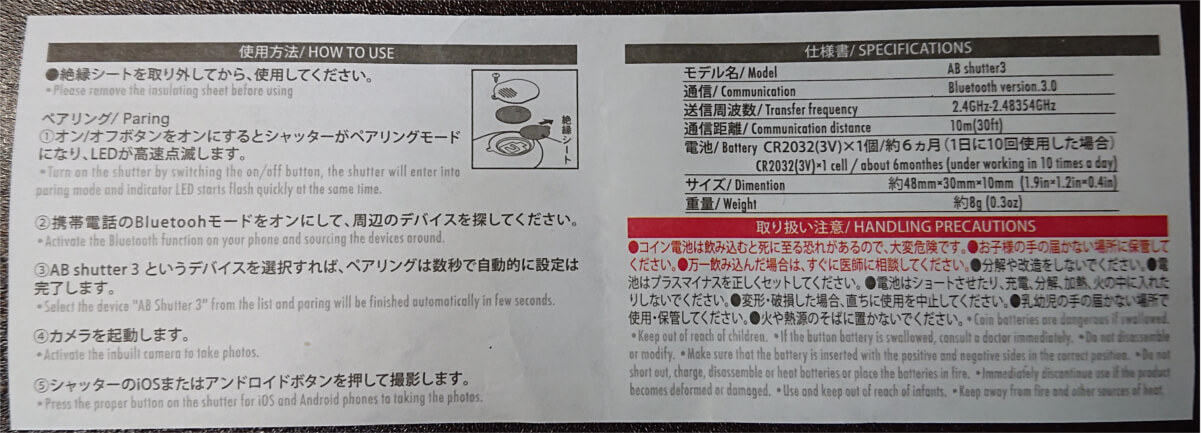
Bluetoothシャッターの説明書ではBluetoothのバージョンは3.0,通信距離は10メートルほど.
私はダイソーにて300円で購入しましたが,後からAmazonを見ると192円から類似品が販売されていたようです.一応アフィリンクを貼っておきます.

参考になる先人の教え
ハードウェアの仕様についてはこの記事が非常に参考になります.
IoTボタン化についてはこの記事が非常に参考になります.

iOSボタンとAndroidボタンがありますが,通常はイベント内容が同じなので区別出来ません.配線を変えることでイベントを分けることが出来るようです.

RaspberryPiにBluetoothシャッター接続する
RaspberryPiでBluetoothを使う準備
RasPiでBluetoothを使うためにパッケージをインストールします.
$ sudo apt install bluetooth pi-bluetooth
Bluetoothデバイスの操作にはbluetoothグループに所属している必要があります.piユーザをbluetoothグループを追加して,確認します.
$ sudo usermod -a -G bluetooth pi
$ id pi
uid=1000(pi) gid=1000(pi) groups=1000(pi),4(adm),20(dialout),24(cdrom),27(sudo),29(audio),44(video),46(plugdev),60(games),100(users),105(input),109(netdev),112(bluetooth),999(spi),998(i2c),997(gpio)
再起動します.
$ sudo reboot
RaspberryPiにBluetoothシャッターを接続する
Bluetoothシャッターの電源をONにして,RasPiから接続します.scan onを実行すると周囲のBluetoothデバイスの一覧を表示してくれるので,AB Shutter3をというデバイスを探して接続します.
$ bluetoothctl
Agent registered
[bluetooth]# scan on
Discovery started
...
[NEW] Device FF:FF:00:46:49:FF AB Shutter3
...
[bluetooth]# scan off
[bluetooth]# connect FF:FF:00:46:49:FF
[AB Shutter3 ]# trust FF:FF:00:46:49:FF
Bluebuttonをインストールする
BluebuttonはRubyで動作するのでrubyをインストールして,gemでbluebuttonをインストールします.
$ sudo apt install ruby
$ sudo gem install bluebutton
設定ファイルを作ります.
$ cat <<EOF >bluebutton.conf
keyup=echo UP
keydown=echo DOWN
longup=echo LONG UP
longdown=echo LONG DOWN
EOF
このままBluebuttonを実行してもbluetooth.serviceに以下のエラーが表示されており,イベントを認識することが出来なかった.
$ systemctl status bluetooth.service
● bluetooth.service - Bluetooth service
Loaded: loaded (/lib/systemd/system/bluetooth.service; enabled; vendor preset: enabled)
Active: active (running) since Sun 2020-07-05 04:20:00 JST; 22s ago
Docs: man:bluetoothd(8)
Main PID: 4743 (bluetoothd)
Status: "Running"
Tasks: 1 (limit: 2200)
Memory: 676.0K
CGroup: /system.slice/bluetooth.service
└─4743 /usr/lib/bluetooth/bluetoothd
Jul 05 04:24:11 raspios systemd[1]: Starting Bluetooth service…
Jul 05 04:24:11 raspios bluetoothd[4743]: Bluetooth daemon 5.50
Jul 05 04:24:11 raspios systemd[1]: Started Bluetooth service.
Jul 05 04:24:11 raspios bluetoothd[4743]: Starting SDP server
Jul 05 04:24:11 raspios bluetoothd[4743]: Bluetooth management interface 1.14 initialized
Jul 05 04:24:11 raspios bluetoothd[4743]: Sap driver initialization failed.
Jul 05 04:24:11 raspios bluetoothd[4743]: sap-server: Operation not permitted (1)
Jul 05 04:24:27 raspios systemd[1]: bluetooth.service: Current command vanished from the unit file, execution of the command list won't be resumed.
bluetooth.serviceのエラー回避のため,起動時に--noplugin=sapオプションとExecStartPreの行を追加してサービスを再起動します.
$ cat /lib/systemd/system/bluetooth.service
[Unit]
Description=Bluetooth service
Documentation=man:bluetoothd(8)
ConditionPathIsDirectory=/sys/class/bluetooth
[Service]
Type=dbus
BusName=org.bluez
ExecStart=/usr/lib/bluetooth/bluetoothd --noplugin=sap
ExecStartPre=/usr/sbin/rfkill unblock bluetooth
NotifyAccess=main
WatchdogSec=10
Restart=on-failure
CapabilityBoundingSet=CAP_NET_ADMIN CAP_NET_BIND_SERVICE
LimitNPROC=1
ProtectHome=true
ProtectSystem=full
[Install]
WantedBy=bluetooth.target
Alias=dbus-org.bluez.service
$ sudo systemctl daemon-reload
$ sudo systemctl restart bluetooth.service
ここまでの設定でボタンのDOWN/UPが検知出来るようになりました.が,長押しの設定が機能しなかったので原因がわかったら追記します.
$ bluebutton -c ./bluebutton.conf
Try to find device AB Shutter3…
Device AB Shutter3 find at /dev/input/event0
Reading events from /dev/input/event0…
DOWN
UP
DOWN
UP
RaspberryPiからWOL
WOLの条件

WOLはマジックパケットをブロードキャストとして送信して,対象のPCを起動します.WOLの条件は色々なサイトで紹介されています.重要な部分は主に次の3点.
1. 起動したいマシンのハードウェアが WoL に対応していること
2. 起動したいマシンの MAC アドレスが分かっていること
3. 起動したいマシンへマジックパケットを送信できる環境
https://tipszone.jp/20120516_wake-on-lan/
マシン側ではBIOSの他にOSでも設定が必要となります.Windowsの場合はデバイスマネージャーからネットワークアダブターのプロパティでWOLを有効にします.Linuxではethtoolを利用して同様の設定が出来ます.起動するマシン側の設定はネット上にたくさん情報が落ちているので割愛します.またパケットを送信できる環境につては,ルーターの設定が必要な場合があります.WAN側からWOLしたい場合はセキュリティ観点での考慮が必要になります.
RaspberryPiからWOL
RaspberryPi OSではマジックパケットを送信するのに以下のパッケージを利用できます.マジックパケットは簡単な構造なので自分で実装することも出来ます.
$ sudo apt install wakeonlan
$ wakeonlan ${起動したいPCのMACアドレス}
これをBluebuttonの設定ファイルに書いておけば設定完了です.
$ cat bluebutton.conf
keyup=wakeonlan ${起動したいPCのMACアドレス}
keydown=echo DOWN
longup=echo LONG UP
longdown=echo LONG DOWN
これでBluebuttonを実行しておけばWOLの待受側も準備完了.ボタンを押せばWOLでPCのが起動します.
Bluebuttonのサービス化
ついでなのでBluebuttonを簡単にサービス化しておきます.
$ cat <<EOF | sudo tee /etc/systemd/system/bluebutton.service
[Unit]
Description=Bluebutton for WOL
[Service]
ExecStart=bluebutton -c /home/pi/bluebutton.conf
Restart=always
Type=simple
[Install]
WantedBy=multi-user.target
EOF
$ sudo systemctl daemon-reload
$ sudo systemctl start bluebutton.service
これでsystemctlコマンドでサービスとして起動出来るようになりました.
おわりに
ダイソーのBluetoothシャッターでWOLを利用する方法を書きました.これでノートPCを閉じたままでも電源ON出来るようになったので,ノートPCを開いていたスペースを活用できるようになります.


コメント